Table of Contents
- Architecture Overview
- Prerequisites
- DGX Spark Node Preparation
- Management Network (10GbE) Connection
- Compute Network (200GbE QSFP) Physical Connection
- Installing sparkrun on Spark Nodes
- Speed and RDMA Tests
- Running Models with sparkrun
- Results and Verification
- Troubleshooting
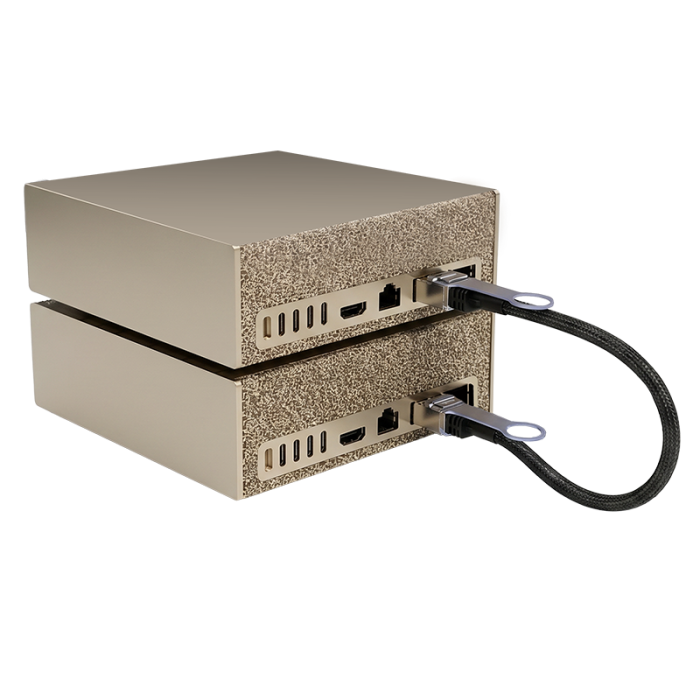
NVIDIA DGX Spark Bundle
2 DGX Spark nodes, 200GbE RoCEv2 RDMA, and sparkrun cluster management for an end-to-end AI infrastructure.
Purchase This Product →This document describes the end-to-end installation and configuration steps for an AI cluster consisting of 2 NVIDIA DGX Spark nodes in a point-to-point topology. The cluster uses the sparkrun toolkit to manage distributed AI workloads and model execution.
The document covers the preparation of management and compute networks, ConnectX-7 QSFP112 port configuration, RoCEv2/RDMA settings, SSH access, and cluster health check steps.
Architecture Overview
| Component | Description |
|---|---|
| DGX Spark × 2 | Each has a ConnectX-7 200GbE QSFP112 port |
| QSFP112 Cable | Amphenol: NJAAKK-N911 |
| sparkrun | Cluster management, SSH mesh and CX7 configuration toolkit |
Prerequisites
Hardware
- 2× NVIDIA DGX Spark systems
- 1× Amphenol: NJAAKK-N911 cable
- Cat6 cables (management network)
Software and Operating System
- DGX OS (pre-installed on each Spark system)
- Internet access (for package downloads and updates)
Knowledge and Access
- Basic Linux command-line knowledge
- Physical access to all devices (for cable connections)
DGX Spark OS Installation
You can use the following video for DGX Spark OS installation:
NVIDIA DGX Spark Kurulumu Part 1
DGX Spark Node Preparation
Before proceeding to physical connections and network configuration, ensure that all Spark systems are running the latest software and firmware versions. A significant portion of performance issues encountered during installation stem from outdated drivers, missing updates, or firmware incompatibilities.
The following steps must be applied on both Spark systems.
System and Firmware Updates
First, update the operating system packages:
sudo apt update
sudo apt dist-upgrade
Then update the system firmware:
sudo fwupdmgr refresh --force
sudo fwupdmgr upgrade
Check the DGX Dashboard for any available updates and apply them if present:
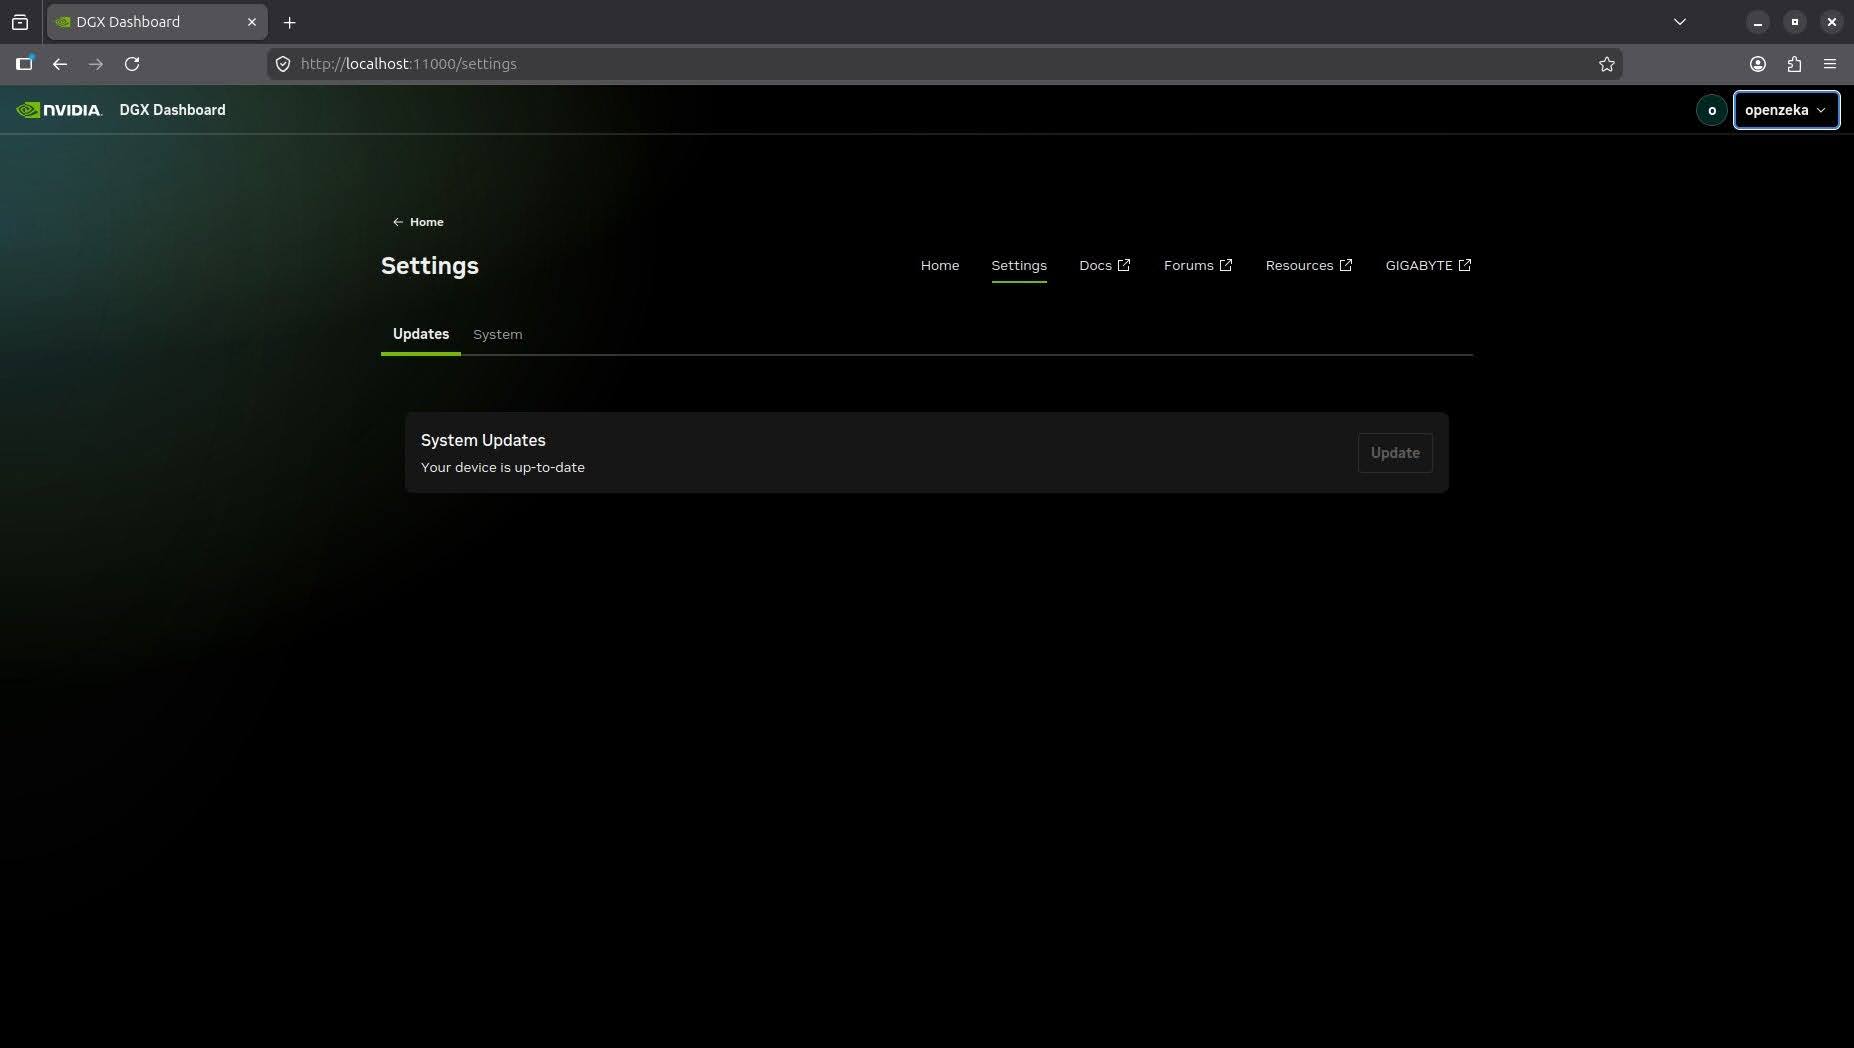
After updates are complete, reboot the system:
sudo reboot
During testing, it was observed that outdated firmware versions caused connection performance to fall short of expected levels. Therefore, updating all systems as the first step is recommended.
Docker Configuration
To allow container-based tools used in subsequent steps to run without sudo, Docker post-install procedures are applied on each Spark.
First, add the current user to the Docker group:
sudo groupadd docker
sudo usermod -aG docker $USER
newgrp docker
Verify the configuration with the following test:
docker run hello-world
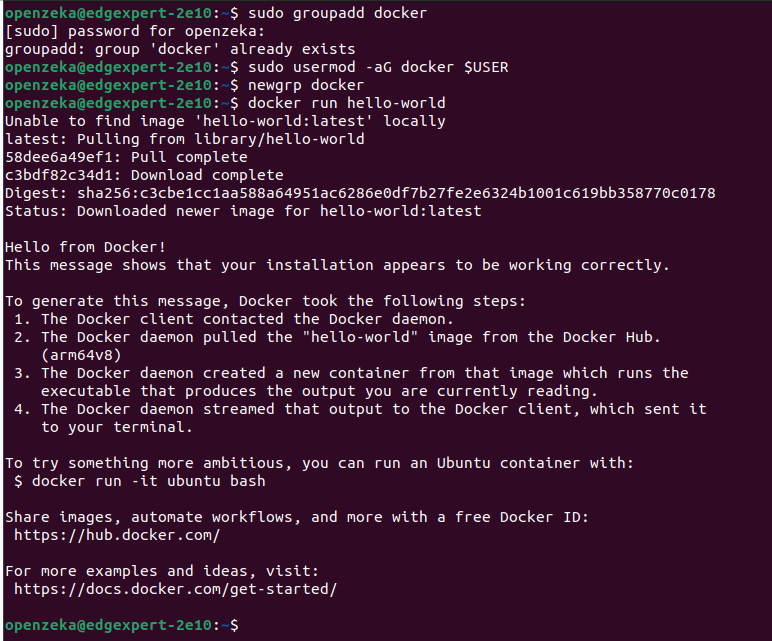
Successful execution of the command and Docker’s ability to launch the example container confirms that the necessary preparation for container-based tools in subsequent steps is complete.
Checking the Storage Driver
Additionally, the Docker storage driver was checked on all Spark nodes. The docker info output confirmed the Storage Driver value is overlayfs. If overlay2 or a different storage driver is detected, Docker was configured to use the containerd snapshotter (overlayfs) and the Docker service was restarted. This ensured a consistent runtime environment across all nodes.
First, the current storage driver was checked with the following command:
docker info -f 'Driver= DriverStatus= DockerRootDir='
If the output shows overlay2, the following configuration was applied:
sudo tee /etc/docker/daemon.json >/dev/null <<'EOF'
{
  "features": {
    "containerd-snapshotter": true
  }
}
EOF

sudo systemctl restart docker
After configuration, the same check command was run again and the storage driver was confirmed to be overlayfs.

Management Network (10GbE) Connection
Each DGX Spark’s 10GbE Ethernet port is connected to one of the switch’s RJ45 ports using a Cat6 cable. After plugging in, verify that the corresponding port’s link indicator is lit on the switch.
Open a terminal on the Spark desktop and check whether the device has obtained an IP address:
ip addr show
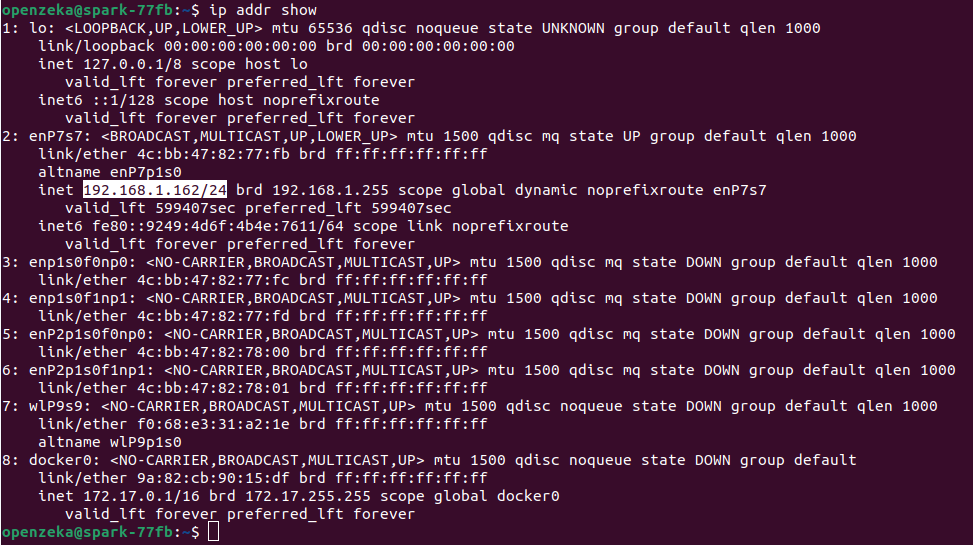
If you see an IP address on the 10GbE interface as in the example, SSH access over the management network is available. If no IP address is assigned, assign one manually via the DGX OS desktop:
- Click the network icon in the top right corner → select Wired Settings
- Click the gear (⚙) icon next to the relevant 10GbE connection
- Switch to the IPv4 tab
- Change the Method to Manual
- Enter the following information:
- Address: 192.168.1.148 (different for each Spark, e.g. .147 — adjust to your network)
- Netmask: 255.255.255.0
- Gateway: 192.168.1.1 (if available, otherwise leave blank)
- DNS: 1.1.1.1,8.8.8.8
- Click Apply and toggle the connection off and back on
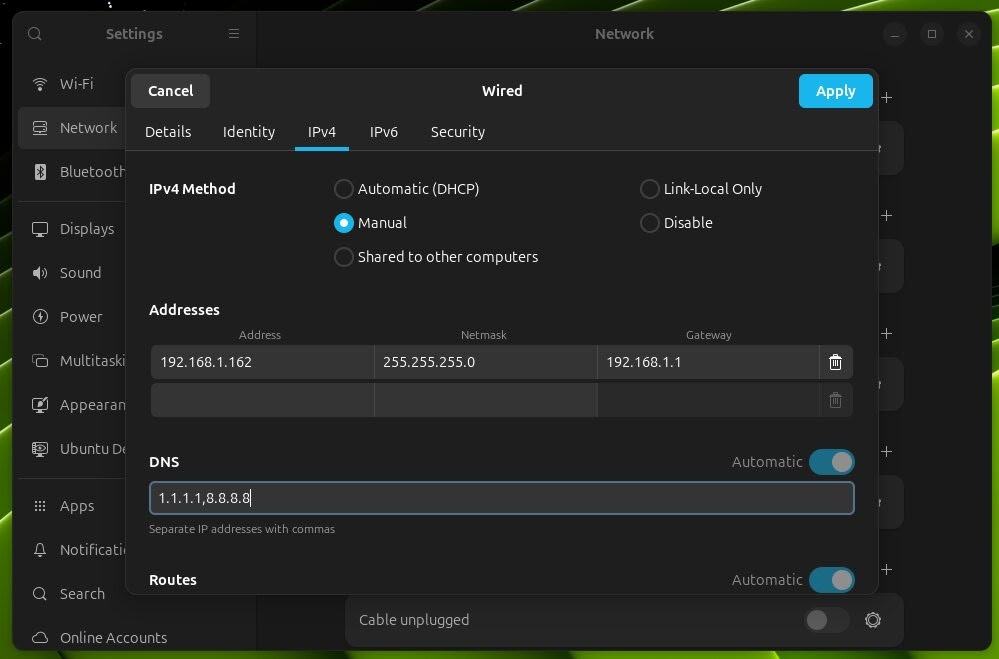
If internet access is available, the 10GbE management connection is ready. Repeat the same steps on the other Spark system, assigning a different IP address.
Inter-node Access Check
Verify that all Spark systems can see each other over the management network. From one Spark, ping the other:
ping -c 4 192.168.1.148
If all pings are successful, the management network is ready and all nodes can communicate with each other.
Compute Network (200GbE QSFP) Physical Connection
In this setup, the two Spark systems are connected to each other at 200GbE via their ConnectX-7 QSFP112 ports.
Cable Plan
The port mapping for the physical connection between the two Spark systems is as follows:
| Source | Destination |
|---|---|
| Spark1 Port0 | Spark2 Port0 |
Installing sparkrun on Spark Nodes
User and SSH Configuration
After the network configuration is complete, a common user must be created on all nodes so that the Spark systems can communicate with each other without passwords. sparkrun uses this user to SSH into all nodes and perform cluster management operations.
Setting Hostnames Assign a unique hostname to each Spark. This is essential for SSH known_hosts management, log analysis, and cluster node tracking:
# On Spark 1:
sudo hostnamectl set-hostname spark1

# On Spark 2:
sudo hostnamectl set-hostname spark2
Creating a Shared User
The same username must be created on all Spark systems. This document uses the nvidia username. Run the following commands on both Spark systems:
sudo useradd -m nvidia
sudo usermod -aG sudo nvidia
sudo passwd nvidia
Use the same password on all systems — it simplifies management. During sparkrun SSH mesh setup, this password is prompted on first connection, after which key-based authentication takes over.
Passwordless Sudo Configuration
sparkrun runs commands with sudo during CX7 network configuration. To prevent password prompts each time, passwordless sudo must be configured:
echo "nvidia ALL=(ALL) NOPASSWD:ALL" | sudo tee /etc/sudoers.d/nvidia
sudo chmod 440 /etc/sudoers.d/nvidia
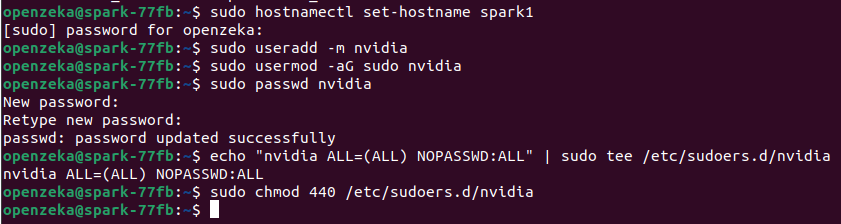
sparkrun Installation
The installation is performed under the nvidia user account.
su - nvidia
First, install the uv package:
curl -LsSf https://astral.sh/uv/install.sh | sh
source ~/.bashrc
Then install sparkrun:
uvx sparkrun setup
Answer the prompts during installation:
- First, enter the IP addresses of the devices:
- Provide a name for the cluster
- Enter
nvidiaas the SSH username (created in the previous step) -
Select Y for MESH setup
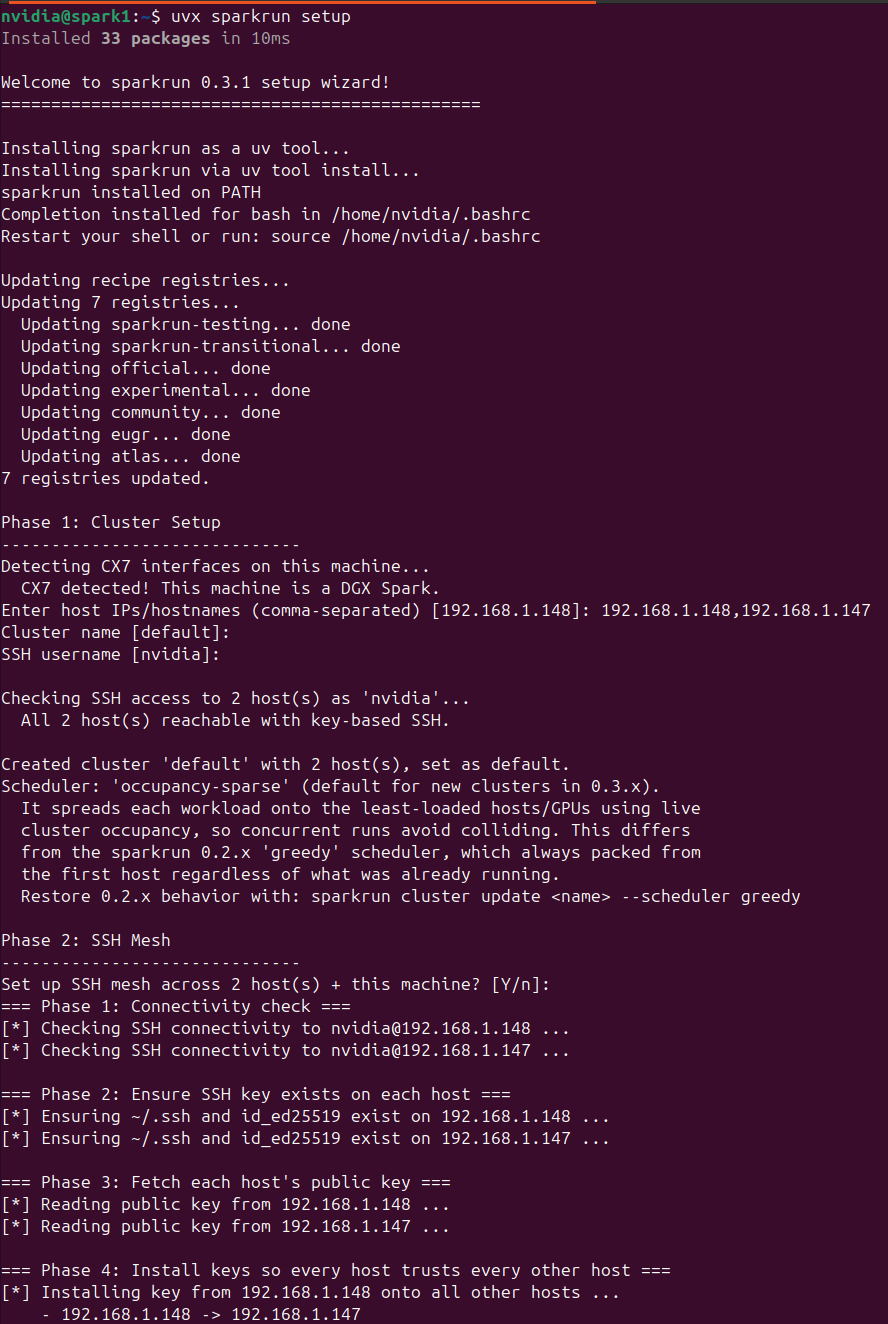
-
Answer Y to “Configure CX7 networking?”:
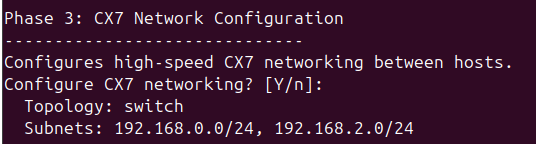
- Answer Y to “Add ‘nvidia’ to the docker group on all hosts?”
- Answer Y to “Generate the NVIDIA CDI spec on all hosts?”
- Answer Y to “Install sudoers entries?”
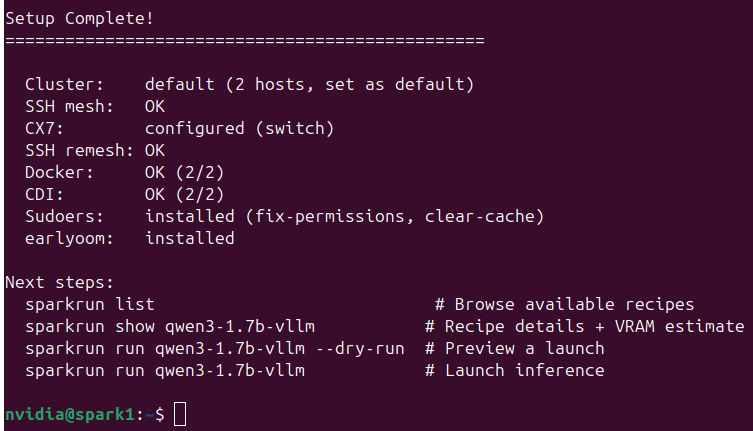
- Answer Y to “Install earlyoom?”
-
When the “Setup complete” message appears, the installation is successfully finished
Speed and RDMA Tests
In this step, we will verify that the compute network is functioning correctly and that RDMA communication over RoCEv2 performs as expected.
IP Assignment Reference The IP addresses assigned by the sparkrun wizard to the CX7 interfaces are shown below. In your scenario, use your own addresses instead:
| Spark | Management (enP7s7) | enp1s0f1np1 | enP2p1s0f1np1 |
|---|---|---|---|
| Spark 1 | 192.168.1.148 | 192.168.0.148 | 192.168.2.148 |
| Spark 2 | 192.168.1.147 | 192.168.0.147 | 192.168.2.147 |
In the current topology, there are 2 subnets between the nodes. Tests are performed on one subnet; tests for the other subnet can be repeated similarly:
- Subnet 1: 192.168.0.0/24
- Subnet 2: 192.168.2.0/24
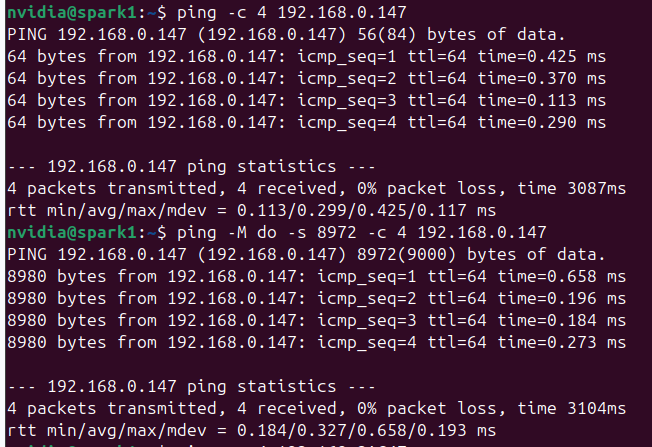
IP and MTU Test From Spark 1, test connectivity and jumbo frames by pinging Spark 2:
# On Spark 1:
ping -c 4 192.168.0.147
ping -M do -s 8972 -c 4 192.168.0.147
The first ping tests basic connectivity; the second tests 9000-byte MTU. -M do prevents fragmentation — if the packet doesn’t drop, MTU 9000 is working end-to-end.
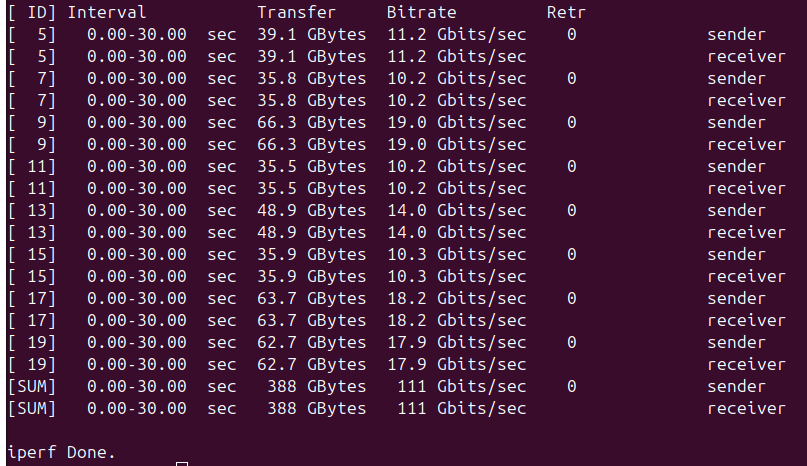
TCP Throughput Test (iperf3) Measure the basic bandwidth over the Ethernet/IP layer. This test is not RDMA — it uses TCP with CPU involvement.
# On Spark 2 (server):
iperf3 -s
# On Spark 1 (client):
iperf3 -c 192.168.0.147 -P 8 -t 30
-P 8 means eight parallel streams, -t 30 means a thirty-second test duration. Expected result: ~100-120 Gbps total throughput.
Note: Install iperf3 if it’s not already installed:
sudo apt install iperf3
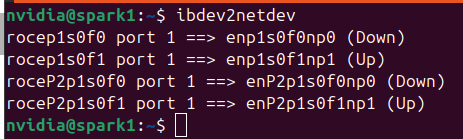
Identifying RDMA Devices List the RDMA device names:
ibdev2netdev
Example output: rocep1s0f0 port 1 ==> enp1s0f0np0 (Down) rocep1s0f1 port 1 ==> enp1s0f1np1 (Up) roceP2p1s0f0 port 1 ==> enP2p1s0f0np0 (Down) roceP2p1s0f1 port 1 ==> enP2p1s0f1np1 (Up)
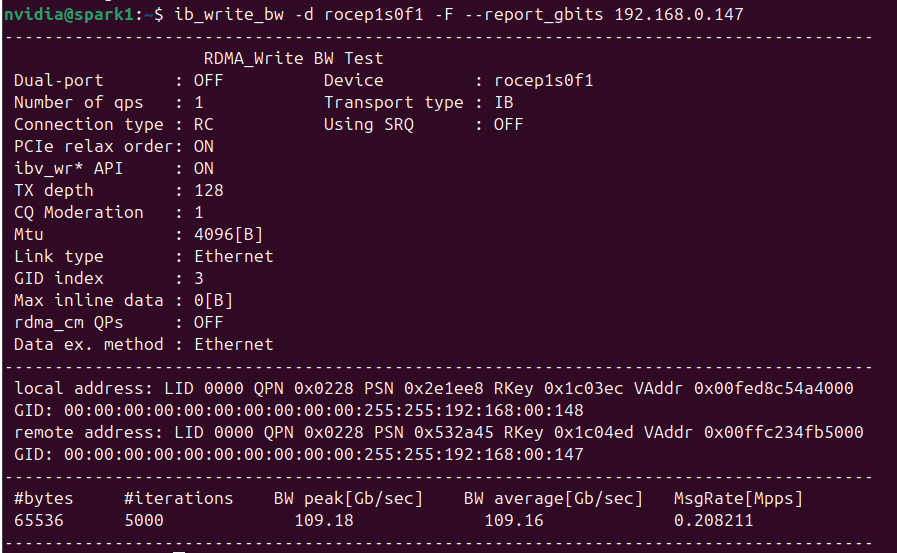
RDMA Write Test (ib_write_bw) Measure the bandwidth of RDMA write operations over RoCEv2. This tests direct memory transfer without CPU involvement.
Subnet 1: On Spark 2 (server):
ib_write_bw -d rocep1s0f1 -F --report_gbits
On Spark 1 (client):
ib_write_bw -d rocep1s0f1 -F --report_gbits 192.168.0.147
Expected result: ~100-111 Gbps.
Subnet 2: On Spark 2 (server):
ib_write_bw -d roceP2p1s0f1 -F --report_gbits
On Spark 1 (client):
ib_write_bw -d roceP2p1s0f1 -F --report_gbits 192.168.2.147
Expected result: ~100-111 Gbps.
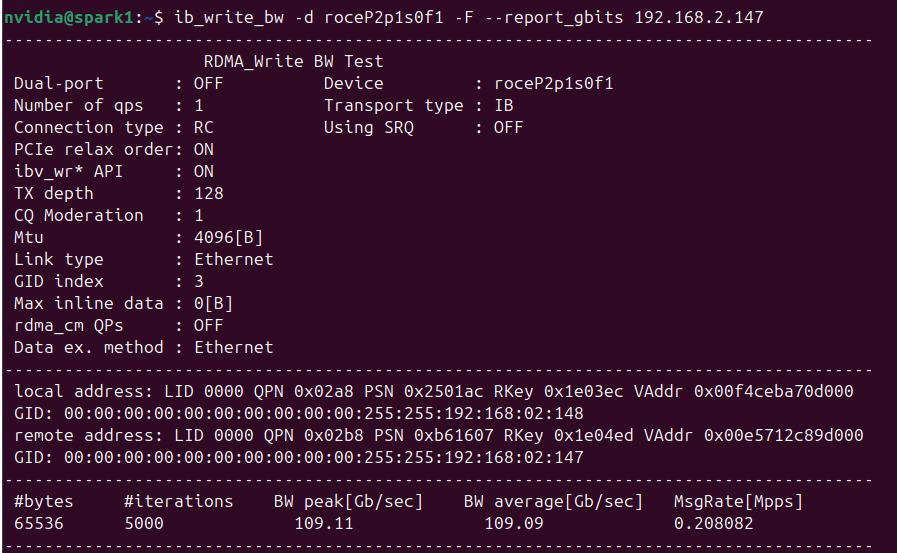
If both interfaces deliver ~100 Gbps, there is a total of ~200 Gbps RDMA bandwidth between the Spark systems.
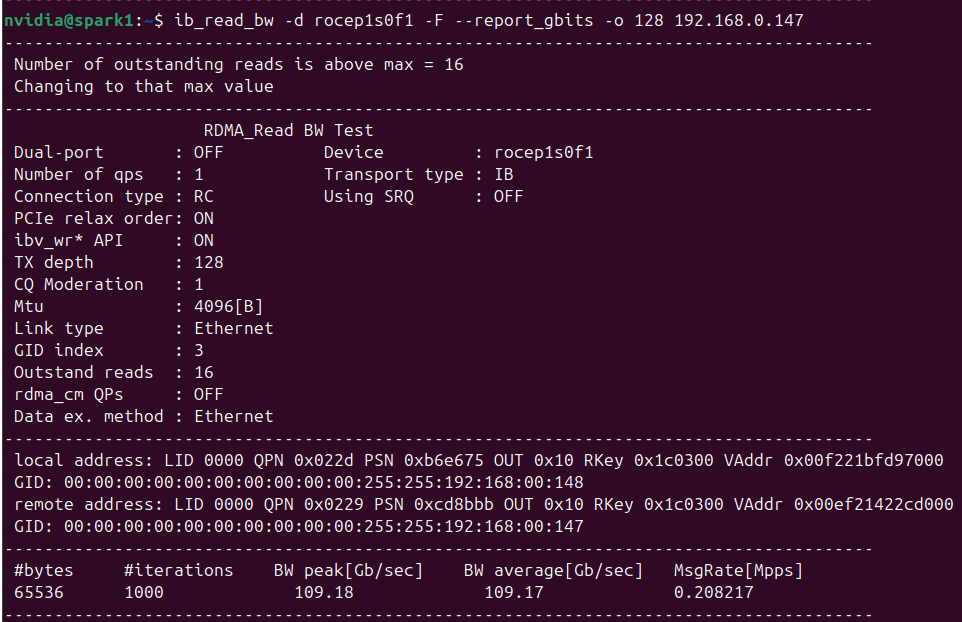
RDMA Read Test (ib_read_bw) Measure the bandwidth of RDMA read operations:
Subnet 1: On Spark 2 (server):
ib_read_bw -d rocep1s0f1 -F --report_gbits
On Spark 1 (client):
ib_read_bw -d rocep1s0f1 -F --report_gbits 192.168.0.147
Expected result: ~95-110 Gbps.
Subnet 2: On Spark 2 (server):
ib_read_bw -d roceP2p1s0f1 -F --report_gbits
On Spark 1 (client):
ib_read_bw -d roceP2p1s0f1 -F --report_gbits 192.168.2.147
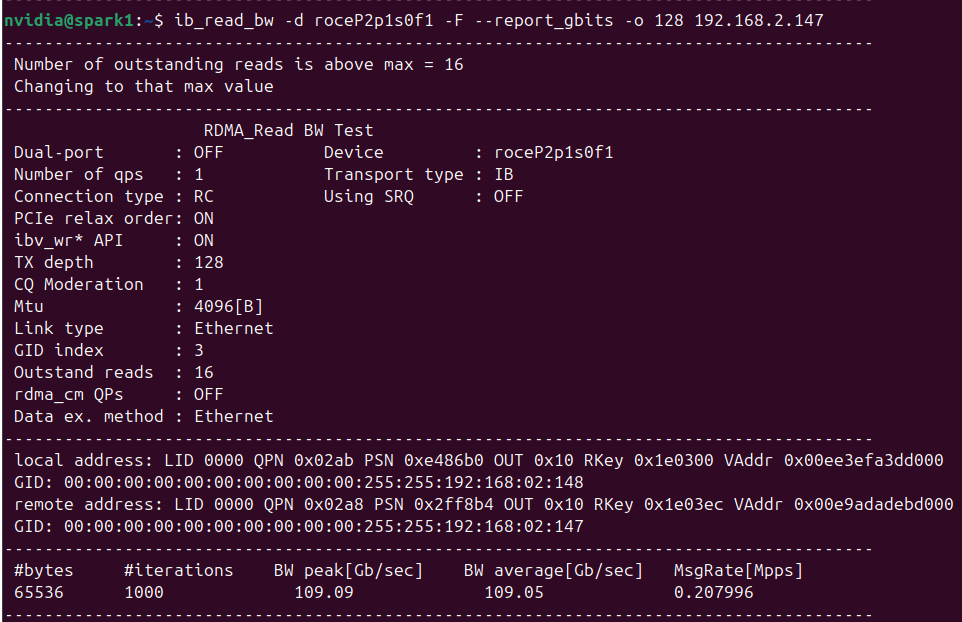
Expected result: ~95-110 Gbps.
RDMA Latency Test (ib_write_lat) On Spark 2 (server):
ib_write_lat -d rocep1s0f1
On Spark 1 (client):
ib_write_lat -d rocep1s0f1 192.168.0.147
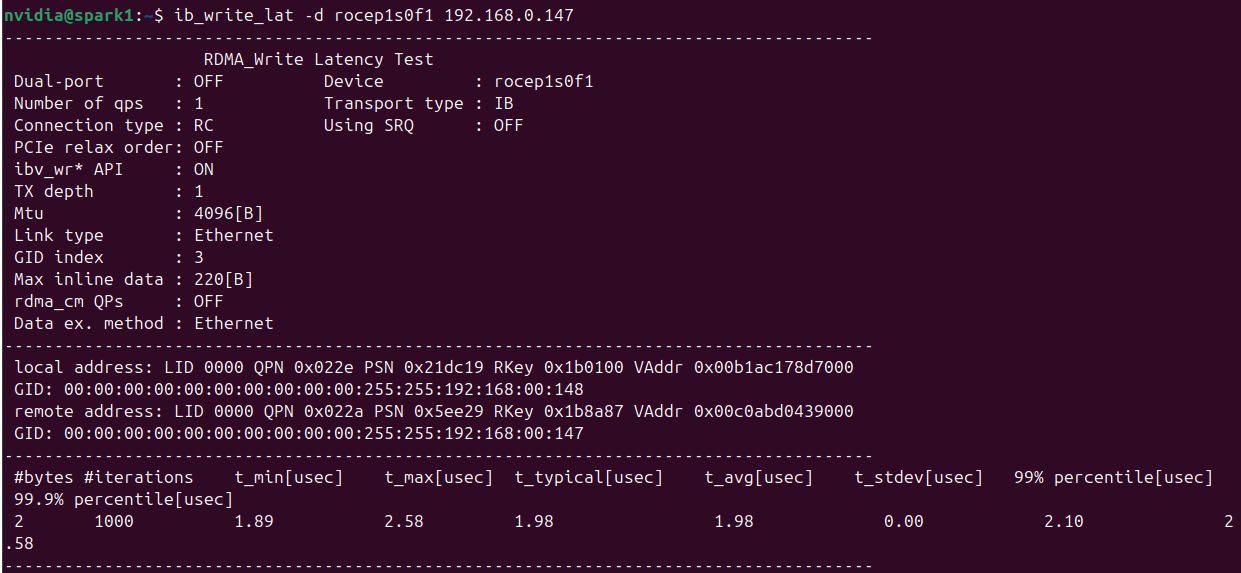
Expected result: ~1-3 microsecond latency.
Running Models with sparkrun
In this step, we will run a multi-node inference workload via sparkrun to verify that the cluster works end-to-end.
Model and Recipe
This test uses the nvidia/MiniMax-M2.7-NVFP4 model. The model runs with tensor parallelism (TP=2) across 2 nodes. sparkrun’s built-in recipe is configured to use the vllm-distributed runtime; therefore, a custom YAML file was prepared to use the vllm-ray runtime for 2 nodes.
Running the Model Save the following YAML file as minimax-M2.7-nvfp4.yaml:
model: nvidia/MiniMax-M2.7-NVFP4
name: MiniMax-M2.7-NVFP4
runtime: vllm-ray
min_nodes: 2
container: sparkrun-eugr-vllm

defaults:
  max_model_len: 196608
  host: 0.0.0.0
  port: 8000
  tensor_parallel: 2
  gpu_memory_utilization: 0.85
  reasoning_parser: minimax_m2
  tool_call_parser: minimax_m2
  load_format: instanttensor
  pipeline_parallel: 1
recipe_version: '2'
env:
  VLLM_MARLIN_USE_ATOMIC_ADD: '1'
builder: eugr
metadata:
  quantization: nvfp4
  head_dim: 128
  num_kv_heads: 8
  description: MiniMax-M2.7 NVFP4 (NVIDIA quant)
  kv_dtype: fp8
  model_dtype: nvfp4
  quant_bits: 4
  num_layers: 62

command: |-
  vllm serve {model} \
    --trust-remote-code \
    --gpu-memory-utilization {gpu_memory_utilization} \
    -tp {tensor_parallel} \
    -pp {pipeline_parallel} \
    --max-model-len {max_model_len} \
    --load-format {load_format} \
    --enable-auto-tool-choice \
    --tool-call-parser {tool_call_parser} \
    --reasoning-parser {reasoning_parser} \
    --host {host} \
    --port {port}
Then run the model:
sparkrun run minimax-M2.7-nvfp4.yaml
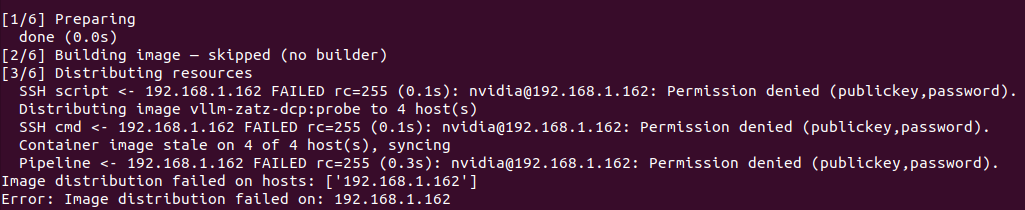
SSH Authorization Error Fix If you encounter an authorization-related error when sparkrun tries to connect to itself after running the command, use the following command and re-run sparkrun:
cat ~/.ssh/id_ed25519.pub >> ~/.ssh/authorized_keys
Verifying the Model is Ready
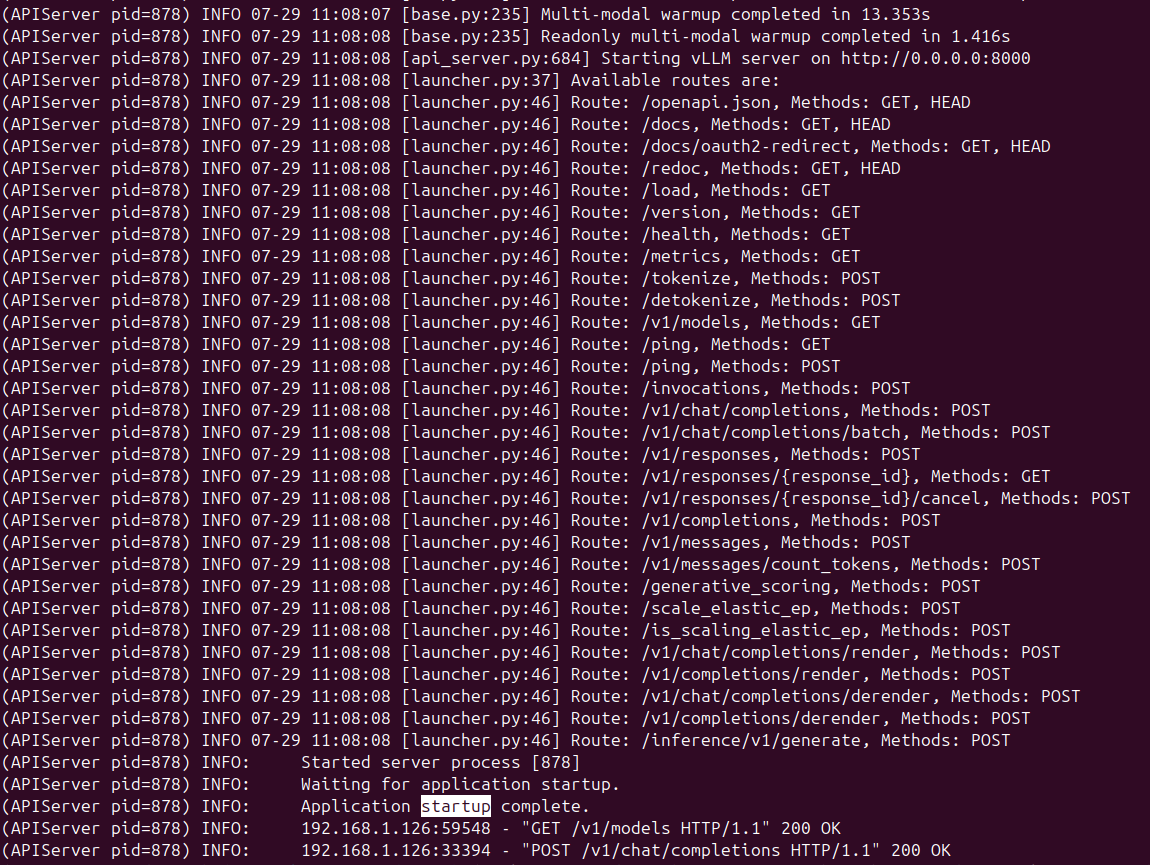
When the model starts, you will see an “Application startup complete.” message, indicating the model is ready for use:
Benchmark Results Average values obtained from tests run with the benchmark tool on the model deployed in this manner are as follows:
| Concurrent Requests | TTFT (ms) | Token/s | Latency (s) | Throughput (RPS) |
|---|---|---|---|---|
| 1 | 245 | 26.27 | 4.87 | 0.21 |
| 2 | 299 | 22.34 | 5.74 | 0.17 |
| 4 | 386 | 17.24 | 7.43 | 0.13 |
| 8 | 450 | 12.69 | 10.09 | 0.10 |
| 16 | 435 | 9.05 | 14.16 | 0.07 |
Results and Verification
By following the steps in this document, a fully functional DGX Spark AI cluster consisting of the following components is set up:
| Component | Status | Verification Method |
|---|---|---|
| Management Network (10GbE) | Ready | Inter-node ping successful |
| Compute Network (200GbE QSFP) | Ready | ib_write_bw ~100-111 Gbps |
| RoCEv2 / RDMA | Ready | ib_write_lat ~1-3 µs |
| sparkrun Cluster | Ready | sparkrun setup completed |
| Model Service | Ready | “Application startup complete.” message |
Cluster Health Check Summary
You can perform the following checks to verify that the installation is complete:
- Management network: Can all nodes ping each other?
- Compute network: Does each subnet deliver ~100 Gbps in the
ib_write_bwtest? - MTU: Does the
ping -M do -s 8972test pass without packet loss? - sparkrun mesh: Does passwordless SSH access work to all nodes?
- Model: Are benchmark results consistent with the table above?
If all checks pass, the cluster is ready for AI workloads.
Troubleshooting
Docker Storage Driver Shows overlay2
If you see overlay2 in the docker info output, add the containerd-snapshotter feature to the /etc/docker/daemon.json file and restart Docker (see Docker Configuration).
Jumbo Frame Test with ping -M do Fails
Ensure that the MTU values of the CX7 interfaces on the Spark side are set to 9000: ip link show.
Low RDMA Bandwidth (Below ~100 Gbps)
- Ensure all system and firmware updates have been applied (see System and Firmware Updates).
- Check that cable connections are secure.
- Verify the interface-device mapping with the
ibdev2netdevoutput.
sparkrun SSH Authorization Error
If you encounter an authorization error when running sparkrun:
cat ~/.ssh/id_ed25519.pub >> ~/.ssh/authorized_keys
Run the command above and re-run sparkrun.
NVIDIA DGX Spark Bundle
2 DGX Spark nodes, 200GbE RoCEv2 RDMA, and sparkrun cluster management for an end-to-end AI infrastructure.
Purchase This Product →